Friday, April 29, 2011

Las Vegas Pics


SO we have a day time view out my hotel room (at Hooters... surprisingly nice!), crazy looking clouds on the way to the hotel from the airport, sunset out my room window, and 2 different shots of the Welcome to Las Vegas sign. I found it funny how the both pics of the sign seem like they weren't even taken in the same city! One was farther away and you could see the mountains and hotels, and the other was closer, but no mountains, mostly sky. Have a great Friday!

Friday, April 15, 2011

Bohemian half updo


All I did for this look was tease my hair at the crown with a boar-bristle brush; then I took a 2.5in section of hair where bangs would start, and french braided it a few times, followed by regular braiding until the braid reached just past my ear and bobby pinned it. Next I gathered some hair just on the back of my head (like a half up half down look, not including the first 3-4inches in the front), pushed it up to get more of a "bump" and bobby pinned that. Lastly I used a tiny bit of hairspray only where the bobby pins were so they wouldn't slip out. Enjoy!

Thursday, April 7, 2011

Peach and Navy Spring Makeup Look


Please click pics to enlarge!


This look is a spring navy
and peach look. It seems like a lot of steps, but they are really simple. Steps 1 and 2 are just moisturizers. #3 is a Tarina Tarantino Pearl Glow Primer I put on under my foundation #4 which is Clinique city Base in Pale 01. #5 is Glamoflauge concealer by Hard Candy that I applied under my eyes after my foundation. I love this concealer because it covers almost anything (it even claims it covers tattoos). #6 is a transparent face powder by Clinique that I set my concealer with. Step 7 is Clinique eyeshadow in daybreak that I applied all over my eyelids from lashes to brow bone. For #8 I applied Hard Candy eyeliner in Flip Side and winged it out at the outer corner of my eyes. On step 9 I used Bare Minerals eye shadow in Madras for the crease. I used Sephora brow tint in medium on my eye brows for step 10. On step #11 I used 2 coats Voluminous Million Lashes in black (before this step I curled my lashes). I used step #6 again all over my face. #12 is a very old shimmer powder called Cornsilk skin brightener that I applied just the the top of my cheek bones for a highlighting effect (I think this is made by CoverGirl?). Step 13 I used Bare Minerals Soft Focus True blush on my cheeks and a small amount just above where I applied the Madras above my eyelid crease. Lastly I lined my lips with a Rimmel lip pencil in Natural, applied Estee Lauder Pure Color long lasting lip stick in Caramel Swirl, and topped it off with Maybelline lip plumping gloss in 605. I really enjoyed this look for spring. I am seeing a lot of pastel colors being used for makeup looks right now and since pastels don’t really look good on me, I needed to make up (no pun intended) my own spring look. (PS- I purchased all these products myself, except for the primer which was a free sample with my Sephora order). Hope you like it!

Tuesday, March 29, 2011

Hair Feather Extensions?!?

I happen to love the new hair feather extension trend! My best friend had them in the bottom part of her long hair, so that's where I got the idea. Since my hair is shorter than hers, I put my bundle of feathers about an inch under my part with an extension beads, pliers, and a bobby pin as the hair threader. It was so easy! If you need help with how to put these in, you can find multiple videos on YouTube. You can either purchase a bundle of feathers to make more of a statement (mine came from a wonderful seller on ebay who custom made 5 bundles with the different colors I wanted), or just use one or two feathers for a more subdued look. Since I put a bundle of 7 feathers in, I only did it on one side, but I have a party to go to this weekend and I may put another bundle in on the other side (maybe with a couple of purple or light blue feathers for a funkier look). These should last anywhere from 2 weeks to a few months. Hope you like it!

Friday, March 18, 2011

Spring Break/ Summer Swimsuit Emergency Remedy


So last year I bought the cutest swimsuit online and it came in the mail 2 days before my vacation. To my horror, the bottoms were a junior size! I usually wear a medium bikini bottom, so that is what I ordered. I had the worst side hang overs imaginable! Did I give up and wear an old bikini? Nope... I cut the sides along the seam, then found an old ill fitting bikini and cut the strings from it. Last I just sewed the string from the old bikini into the new one then tied it in a loop, which worked out great since a lot of bikinis have the side tie. So don't be up set if your bikini from last year is too small, or if you bought an ill fitting one, just cut the seams and sew in a tie. It took me only 10 minutes, and I'm NOT a sewer (not as in the thing waste goes into haha). Enjoy!

Friday, March 11, 2011

Spring Nail Design


My first nail post! This is my take on spring nails and the latest crackle craze. I didn't have a crackle polish, but I think the image plate and stamp got the same result. To me it kind of looks like broken black glass... I really like it, and I hope you do to!

Wednesday, May 5, 2010

Homemade Bathroom Crafts


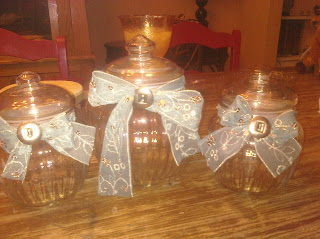
I was wanting bathroom sink decorations (that hold q-tips, cotton balls, etc.) , but all the ones I have seen (that I liked) were almost $100 so I made my own. Here is how I did it:
I bought the glass containers at Walmart in the kitchen section, and the ribbon and buttons in the fabric section. The small glass containers were $5 each and the bigger one was about $7. The ribbon was the most expensive at $15 for 3 yards, the buttons were $3 for 2 (I bought 2), and I don't remember how much the sticky velcro dots were because I already had they laying around my house. So altogether this project was $38 (not including the potpourri, cotton balls, and q-tips I put in them), which wasn't bad considering I was able to choose the color(s) to match my bathroom. It was a pretty simple project, I just tied the ribbon in bows around the glass containers (I measured before I cut!) and stuck one velcro dot to the fabric and the other to the button and pressed them together! I have posted a pic of the finished product, but I will post a pic of them in my bathroom filled with stuff. The big one is the one I filled with potpourri (I only take the lid off when I need the scent), which has little flowers and such in it that you can see through the glass.